
Desserts
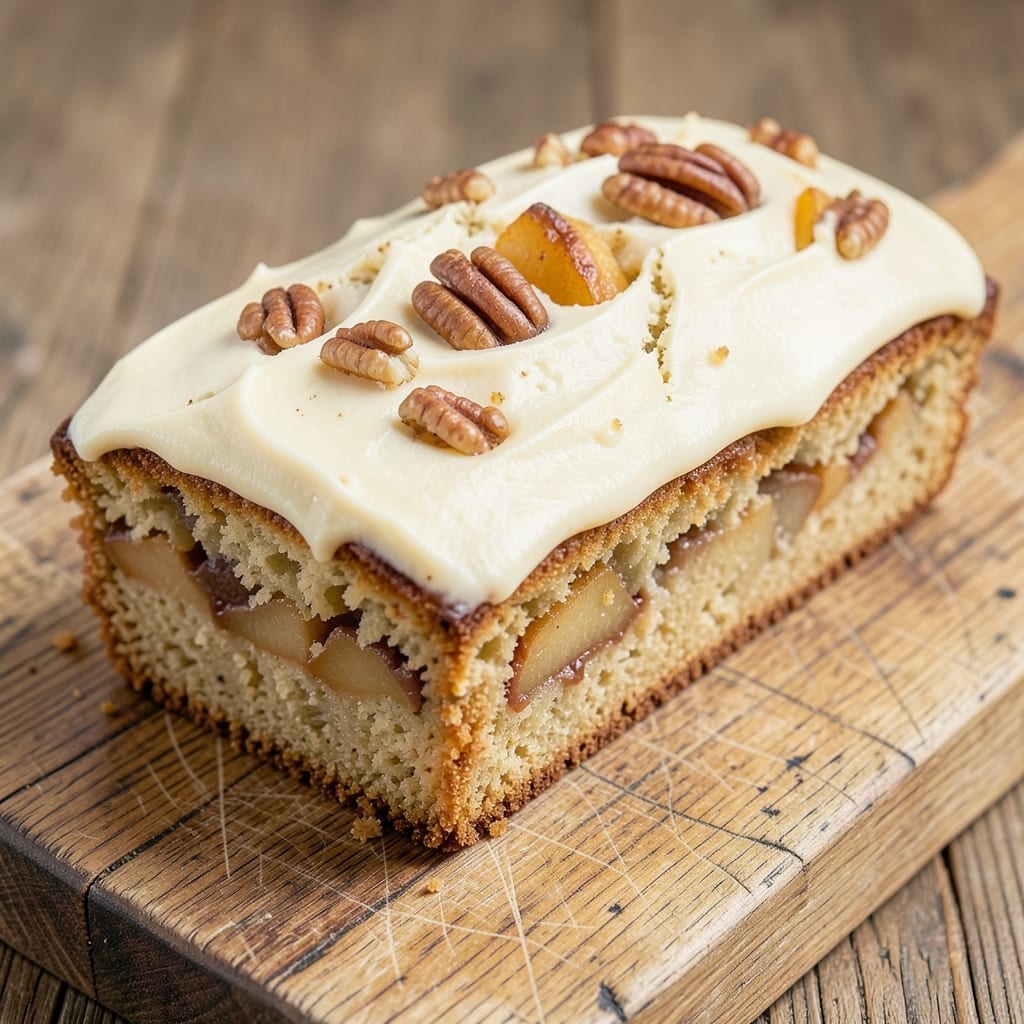
This apple spice pound cake delivers the perfect balance of buttery richness and warm, aromatic spices—like a cozy apple pie in cake form. 🍏 The secret lies in layering tender cake with spiced apple filling, creating a dessert that’s both elegant and comforting. Every slice reveals moist, golden layers infused with cinnamon, nutmeg, and cardamom, while the apples add natural sweetness and subtle tartness that keeps it from being too heavy.
The recipe starts with a classic pound cake base—flour, sugar, butter, and eggs—elevated by a blend of warm spices that mimic classic apple pie seasoning. Thinly sliced apples are simmered with brown sugar and vanilla until tender, then layered between cake batter before baking for 45–60 minutes at 350°F. The result? A cake with a tender crumb, caramelized edges, and a filling that’s just sweet enough to satisfy without overpowering.
What makes this cake truly special is how the spices and apples work together—cinnamon adds warmth, nutmeg brings depth, and the apples contribute a gentle tartness that cuts through the richness. Serve it warm with vanilla ice cream or a dollop of whipped cream for the ultimate dessert experience. The aroma alone will have everyone gathering around the table.
Perfect for holidays, brunch, or an indulgent weeknight treat, this cake keeps well for up to 3 days at room temperature or can be frozen for longer storage. The layers stay moist, and the flavors deepen over time, making it an ideal make-ahead dessert. Let’s get baking!
Ingredients for apple spice pound cake
Buttery layers meet warm apple pie spice in this cozy, aromatic pound cake.
| Ingredient | Amount | Notes |
|---|---|---|
| All-Purpose Flour 🌾 | 2 ½ cups | Sifted for light texture |
| Granulated Sugar 🍚 | 1 ½ cups | White or light brown |
| Light Brown Sugar 🍚 | ½ cup | Packed lightly |
| Unsalted Butter 🧈 | 1 cup | Cold, cubed for creaming |
| Large Eggs 🥚 | 4 whole | Room temperature |
| Vanilla Extract 🍯 | 2 tsp | Pure extract preferred |
| Ground Cinnamon 🌶️ | 2 tsp | Freshly ground if possible |
| Ground Nutmeg 🌿 | ½ tsp | Freshly grated preferred |
| Ground Cardamom 🌿 | ½ tsp | Freshly ground for best flavor |
| Salt 🧂 | ½ tsp | Fine sea salt |
| Red Delicious Apples 🍎 | 4 medium | Peeled, cored, thinly sliced |
| Granulated Sugar (for apples) 🍚 | ¼ cup | For simmering apples |
| Vanilla Bean Paste 🍯 | 1 tsp | Or 0.5 tsp vanilla extract |
| Powdered Sugar 🍚 | ¼ cup | For dusting top |
The apples are everything here—Red Delicious or Honeycrisp work best, but any firm apple does. Local farmers markets often have the sweetest varieties, but the grocery store will do in a pinch. Peel and slice them paper-thin (about 1/8-inch) so they cook through without turning mushy. If you're feeling fancy, toss the slices in a bit of lemon juice before simmering to keep them bright. The spices? Penzeys or Spicewalla for the freshest grind—nutmeg and cardamom make all the difference. Don't skip the vanilla bean paste if you can get it; it adds depth regular extract can't match.
No Red Delicious? Granny Smith or Fuji hold up well too. Short on cardamom? Double the cinnamon and add a pinch of allspice—it’s a great swap. The butter matters—European-style or Plugrá gives the best flavor. If you're in a hurry, use regular unsalted, but take it out of the fridge 30 minutes ahead to soften. For the apples, if they start browning while you wait, toss them in cold water to stop the process. The vanilla bean paste can be swapped for extract, but you'll need half the amount since it's more concentrated.
This cake is a make-ahead dream—bake it a day ahead and let the flavors meld. Store wrapped at room temperature for 3 days, or freeze for up to 3 months. To reheat, pop slices in a 350°F oven for 5 minutes—they'll be warm and gooey. The layers stay moist, but if you're not serving it right away, cover tightly with plastic wrap. Pro tip: Dust the top with powdered sugar right after baking while it's still warm—it'll melt slightly and give that bakery-fresh look.
Why You'll Love This Recipe
- Here’s what sold me: this cake works for anything. Toast a slice for breakfast with a smear of butter, or serve it warm with vanilla ice cream. My kids grab it straight from the fridge for a snack—no judgment here.
- No Mixer Needed: I swear by this recipe because it’s one of those rare cakes that comes together with a bowl and a whisk—no stand mixer, no fuss. The butter gets creamed with sugars until it’s light and fluffy, and the eggs fold right in without needing to overthink it.
- Spiced Warmth in Every Bite: That combo of brown sugar and cinnamon? It’s like autumn in cake form, but the real magic happens when the apples get folded into the batter. Honestly, the first time I made this, I nearly licked the spoon clean—it’s that good.
- Breakfast or Dessert Flex: Here’s what sold me: this cake works for anything. Toast a slice for breakfast with a smear of butter, or serve it warm with vanilla ice cream. My kids grab it straight from the fridge for a snack—no judgment here.
Step-by-step instructions for apple spice pound cake
Here's how to create layers of buttery perfection with warm apple-pie spice throughout.
🍳 Step 1: Cream Butter and Sugars to Fluffy Perfection
In a stand mixer fitted with the paddle attachment, beat the 1 cup unsalted butter (cold and cubed) with the 1.5 cups granulated sugar and 0.5 cup light brown sugar on medium speed for 3-4 minutes. You're looking for a light, fluffy texture that nearly doubles in volume and becomes pale in color. This creaming process incorporates air, which gives your cake that signature tender crumb.
Here's the thing—I like to scrape down the sides of the bowl every minute or so. It ensures even mixing and prevents any sugar from clumping at the bottom. The butter should be completely smooth and look like ribbon when you lift the paddle. If it's still grainy, keep mixing for another minute.
👨🍳 Step 2: Add Eggs and Vanilla for Rich Flavor
Add the 4 whole large eggs one at a time, mixing on low speed for 30 seconds after each addition. Then stir in the 2 teaspoons vanilla extract and 1 teaspoon vanilla bean paste until fully combined. The mixture will look slightly curdled at first, but don't worry—it'll smooth out when you add the dry ingredients.
I always use room temperature eggs for this recipe. They mix more smoothly and incorporate better into the batter. If your eggs are straight from the fridge, let them sit in warm water for 5 minutes first. The vanilla bean paste adds an extra depth of flavor that regular extract can't match—trust me, it's worth the small splurge.
🍳 Step 3: Combine Dry Ingredients and Fold Gently
In a separate bowl, whisk together the 2.5 cups all-purpose flour, 2 teaspoons ground cinnamon, 0.5 teaspoon ground nutmeg, 0.5 teaspoon ground cardamom, and 0.5 teaspoon salt. Sift the flour mixture directly into the wet ingredients while mixing on low speed until just combined—you should still see some flour streaks. Overmixing develops gluten and makes the cake tough.
This is where the magic happens. The spices should be evenly distributed throughout the batter. I like to give the batter one final scrape-down of the sides to make sure everything's incorporated. The batter should be thick but pourable—like a rich, spiced cake batter should be.
🥘 Step 4: Prepare the Apple Filling
While the cake batter rests, peel, core, and thinly slice the 4 medium red delicious apples. In a small saucepan, combine the apple slices with the 0.25 cup granulated sugar (for apples) and 1 cup water. Bring to a simmer over medium heat and cook for 8-10 minutes until the apples are tender but still hold their shape. Stir in the 1 teaspoon vanilla bean paste at the end.
Here's the trick—don't overcook the apples. You want them to be soft enough to eat but still retain their shape. They'll continue cooking slightly when they go into the cake. Drain any excess liquid from the apples before using them in the cake layers. The warm apple filling will infuse the cake with that perfect apple-pie flavor.
🔥 Step 5: Assemble and Bake the Layers
Preheat your oven to 350°F and grease two 9-inch round cake pans. Divide the cake batter evenly between the pans. Spoon half of the apple filling onto each layer, spreading it evenly. Then carefully pour the remaining batter over the apples, tilting the pans to distribute evenly.
Bake for 35-40 minutes or until a toothpick inserted into the center comes out clean. The cake should be golden brown on top and pull away slightly from the edges of the pan. Here's my pro tip: I like to tent the pans with foil after 20 minutes of baking to prevent the tops from browning too quickly. Let the cakes cool in the pans for 10 minutes before transferring to a wire rack.
🍽️ Step 6: Dust and Serve Warm
Once completely cooled, dust the top of each cake layer with the 0.25 cup powdered sugar using a fine-mesh sieve. This gives that classic pound cake finish. Slice between the layers and serve warm for the ultimate experience—each bite delivers that perfect balance of buttery cake, warm spice, and tender apple filling.
This cake tastes even better the next day, but I promise you won't be able to wait. The flavors meld together beautifully, creating a dessert that's perfect for breakfast, brunch, or an after-dinner treat. Store leftovers covered at room temperature for up to 3 days or refrigerate for up to 5 days.
Pro Tips For Making Apple Spice Pound Cake
- Cream Butter and Sugar Slowly: I used to rush this step, thinking it didn’t matter, but taking 3-4 minutes to beat the butter, granulated sugar, and brown sugar until light and fluffy—not just pale—makes all the difference in texture. The cake will be tender, not dense, and the crumb will stay moist longer.
- Sift Dry Ingredients Together: Mix the flour, baking powder, baking soda, salt, and spices before adding them to the wet ingredients. This prevents lumps and ensures even distribution—especially important with spices like cinnamon and nutmeg, which can clump if added separately.
- Don’t Overmix the Batter: Once you fold in the apples (or apple sauce, if using), stop mixing after 10-12 strokes. Overworking the batter introduces too much air, which can cause cracks or a domed top. Just combine until the apples are evenly distributed—no need to be thorough.
- Test for Doneness Early: This cake’s dense, so the toothpick test can be misleading. Instead, check at 45 minutes—if it springs back slowly when pressed, it’s done. Overbaking dries it out, and underbaking leaves it gummy. A thermometer reading of 205-210°F (96-99°C) in the center is foolproof.
Common mistakes when making this dish
Overmixing the Batter
I’ve seen so many cakes turn out dense and tough because the batter was mixed too long after adding the flour. Once you combine your dry ingredients with the wet, mix just until no more flour streaks appear—about 15-20 seconds on low speed. Overmixing develops gluten, which makes the cake chewy instead of tender. Remember, the batter should still look slightly lumpy. 💡
Skipping the Room-Temp Eggs
Cold eggs can cause your butter to seize up and create lumps in the batter. Always let your eggs sit out for at least 30 minutes before using them. If you’re in a rush, place them in warm water for 5 minutes—this ensures they mix smoothly and incorporate air properly. Trust me, the difference is noticeable!
Uneven Apple Distribution
The key to that perfect apple-pie flavor in every bite is spreading the filling evenly. Don’t just dump the apples in the center—spread them out in a thin, even layer so every slice has that warm, spiced apple goodness. If you’re worried about the apples sinking, gently press them down with a spatula before adding the final batter layer. 🍎
Baking Without Tenting
If you bake this cake without tenting the pans after 20 minutes, the tops will brown too quickly while the centers stay underdone. Use heavy-duty aluminum foil to loosely cover the cakes, letting steam escape but preventing over-browning. This keeps the texture moist and the flavor balanced.
Undercooking the Apples
If your apple filling isn’t tender enough, it’ll stay crunchy in the cake, throwing off the texture. Simmer the apples for 8-10 minutes until they’re soft but still hold their shape. Drain any excess liquid before layering—the last thing you want is a soggy cake. A quick taste test will tell you when they’re ready!
Ignoring the Resting Time
After baking, let the cakes cool in the pans for 10 minutes before transferring to a wire rack. This prevents them from cracking or doming as they cool. Patience here ensures clean slices and a professional finish. And don’t skip the powdered sugar dusting—it’s the final touch that makes this cake look (and taste) like it came from a bakery! ✨
Nutrition facts
Frequently asked questions
Can I substitute apples in this recipe?
You can use Granny Smith or Honeycrisp apples for a different flavor profile—Granny Smith adds tartness while Honeycrisp stays sweeter. For a non-apple twist, try peaches or pears (peeled and sliced), but reduce simmering time to 5-6 minutes since they soften faster. Just ensure your fruit holds its shape when cooked.
How do I make this cake without a stand mixer?
Use a hand mixer or even a sturdy whisk! Cream the butter and sugars by hand for 5-7 minutes until light and fluffy—your arm will get a workout, but it works. For the eggs, beat them one at a time by hand, then fold in the dry ingredients gently with a spatula. The key is patience and consistent mixing.
Why is my cake dense instead of tender?
Overmixing the batter after adding flour is the most common cause—gluten develops, making the cake tough. Mix dry ingredients in just until combined (15-20 seconds) and avoid over-creaming the butter. Also, ensure your butter is cold but not frozen and eggs are room temperature for proper aeration.
Can I bake this in a bundt pan instead?
Grease a 10-12 cup bundt pan thoroughly and pour the batter in. Skip the apple layering—simmer the apples with their liquid, then fold them into the batter before pouring. Bake for 50-60 minutes at 350°F until a toothpick comes out clean. The texture will be more uniform, but the flavor remains the same.
How do I store leftovers for maximum freshness?
Wrap the cake tightly in plastic wrap or aluminum foil to keep it moist. Store at room temperature for up to 3 days or refrigerate for 5 days. For longer storage, freeze slices in an airtight container for up to 3 months. Thaw overnight in the fridge before serving—microwaving can make it gummy.